Music · Labelling and colouring worksheet
Parts of a Guitar Worksheet: Free KS2 Music Printable
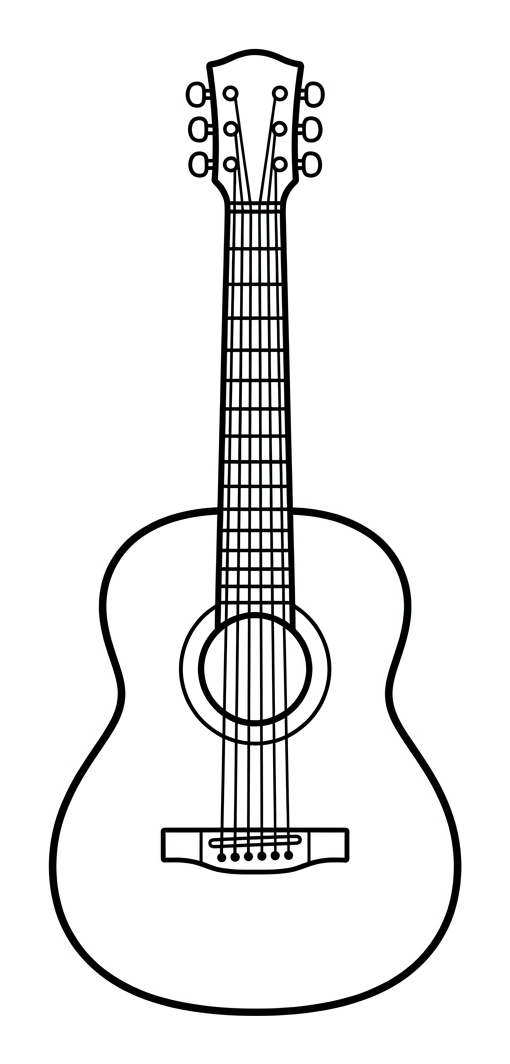
This free printable introduces children aged 7 to 9 to the main parts of an acoustic guitar and the simple science of how it makes sound. Using the word bank provided, children name the body, neck, strings, sound hole, headstock and bridge, then colour the picture to make their own guitar poster.
The worksheet prints to a single A4 page, so it is ready to use straight away at home or in the classroom. It pairs well with any first lesson on stringed instruments and gives children the vocabulary they need before they pick up a real guitar.

Parts of a Guitar
Free Music worksheet · Ages 7 to 9
Label the parts of the guitar
Look at the picture of the acoustic guitar. Use the words in the word bank to write the name of each part on the lines. One word matches each part.
The large, rounded part of the guitar that is hollow inside.
The round opening in the middle of the body that helps make the sound louder.
The long, thin part you hold and press the strings against.
The thin lines that you pluck to make a sound.
The part at the very top that holds the tuning pegs.
The part on the body where the bottom ends of the strings are fixed.
Colour your guitar
Now colour in your guitar. Try to make each part a different colour so the body, neck, headstock and strings all stand out.
- Colour the wooden body and neck a warm brown.
- Colour the headstock and bridge a darker brown.
- Leave the six strings white or colour them silver and grey.
Answer key
- The large, rounded part of the guitar that is hollow inside. — body
- The round opening in the middle of the body that helps make the sound louder. — sound hole
- The long, thin part you hold and press the strings against. — neck
- The thin lines that you pluck to make a sound. — strings
- The part at the very top that holds the tuning pegs. — headstock
- The part on the body where the bottom ends of the strings are fixed. — bridge
What children learn from this worksheet
Naming the parts of an instrument is a small but important step in music education. When children can talk about the body, neck, strings, sound hole, headstock and bridge, they have the shared vocabulary that teachers and tutors use in lessons. This worksheet asks children to match each labelled word to the right part of the guitar using a word bank, which supports recognition before recall. They then colour the guitar, reinforcing the shapes and positions of each part while they enjoy the activity. The combination of labelling and colouring keeps younger KS2 children engaged while building genuine subject knowledge.
How a guitar makes sound
A guitar makes sound when a string is plucked and vibrates. Those fast vibrations move the air, and the hollow body and sound hole make the sound louder so we can hear it clearly. The really useful idea for children to grasp is that the length of the vibrating string changes the note. A longer, looser, thicker string vibrates more slowly and makes a lower sound, while a shorter, tighter, thinner string vibrates faster and makes a higher sound. When a player presses a string against the neck, they shorten the part that can vibrate, which raises the pitch. This is the same principle behind harps, violins and pianos, and it is a friendly first encounter with the idea of pitch and timbre.
Using this printable at home or in class
Print the sheet on plain A4 paper and have colouring pencils or felt tips ready. As a warm-up, talk through the word bank together and see how many parts your child can point to before they write. If you have a real guitar, ukulele or even a picture of one, compare it with the drawing and ask your child to find each part. After labelling, encourage them to pluck a real string (or watch a short video of someone playing) and listen to how the sound changes as the player moves their fingers up the neck. The colouring task makes a lovely display piece and gives slower writers time to finish at their own pace.
Where this fits in the KS2 music curriculum
In Key Stage 2, the national curriculum expects children to play and perform on instruments and to develop an understanding of music, including how sounds are made and the different qualities of those sounds (timbre). Knowing the parts of an instrument and how it produces a note is a sensible foundation for that practical work. This worksheet does not replace hands-on playing, which is the heart of the curriculum, but it builds the language and concepts that make those practical lessons more meaningful. It works well alongside whole-class instrumental teaching in Years 3 and 4.
Frequently asked questions
What are the main parts of an acoustic guitar?
The main parts your child will label on this worksheet are the body (the large rounded part), the neck (the long thin part you hold), the strings, the sound hole (the round opening in the body), the headstock (the top, with the tuning pegs) and the bridge (where the strings are anchored to the body). These are the parts most often named in a first guitar lesson.
Is this guitar worksheet free to print?
Yes. This is a completely free printable. It is designed to fit on a single A4 page, so you can print it at home or in school straight away with no sign-up needed.
What age is this parts of a guitar worksheet for?
It is aimed at children aged 7 to 9, which is Key Stage 2 (Years 3 and 4). Younger or older children can also use it, as the word bank makes the labelling task accessible while the colouring keeps it enjoyable.
Why does a guitar make different sounds?
A guitar makes a sound when a string vibrates. Longer, thicker, looser strings vibrate slowly and make lower notes, while shorter, thinner, tighter strings vibrate quickly and make higher notes. Pressing a string against the neck shortens it, which raises the pitch. The body and sound hole make the sound louder.
Do I need a real guitar to use this worksheet?
No, the worksheet works on its own. However, having a real guitar or ukulele nearby is a lovely bonus, as children can point to each labelled part and hear how plucking different strings changes the sound.
Curriculum links
- Music KS2: play and perform in solo and ensemble contexts, using their voices and playing musical instruments with increasing accuracy, fluency, control and expression.
- Music KS2: develop an understanding of the history of music (contextual: stringed instruments such as the guitar).
- Music KS2: appreciate and understand a wide range of high-quality live and recorded music drawn from different traditions and from great composers and musicians.
- Music KS2: listen with attention to detail and recall sounds with increasing aural memory (recognising timbre and changes in pitch).
- Supports cross-curricular Science (Year 4 Sound): recognise that vibrations from sounds travel through a medium to the ear, and that the pitch of a sound is associated with features of the object that produced it.
Made by The Owee education team. Updated 02/06/2026. Free to print and share.
More learning, made playful
Owee turns topics like this into age-right quizzes for children aged 5 to 10, with a treehouse that grows as they learn. Three subjects are free, forever.
Get Owee free